Introduction
- DRAFT – WORK IN PROGRESS but 99% final!
- See why Riffz was made: An Itch to Scratch.
- Introduction to all Topiary plugins: Introducing Topiary.
- Quick overview of Riffz: Topiary Riffz.
- Download.
Setting up
- Download the Topiary Riffz plugin and install in your favorite plugin folder. You may need to tell your host software to re-scan the list of available plugins.
- Connect some MIDI input into Riffz.
- Connect a sound source to the output of Riffz.
- Load a MIDI drum pattern (or 2, 3, 4) intoRiffz.
- Go to the Variations Tab, enable the variation, connect a key (and optionally an offset) to a pattern.
- Hit play on your host transport.
- Hit the key you assigned a pattern to during playback and see what happens!
User Interface Overview
The user interface has 3 main components:

- Transport Panel
- Variations Panel
- Tabs for various functionality:
- Master Tab – controlling overall settings.
- Variations Tab – for definition of the 8 variations.
- Pattern Tab – for editing and recording MIDI patterns.
- Utility Tab – for various settings and controls.
- Log Tab – log window for errors, warnings and status messages
Action Buttons and Toggle Buttons

- Toggle buttons are buttons you click on of off. These have square corners, and light up blue when selected (on). Some of these buttons may be colored orange; this indicates the button has been toggled but Topiary is waiting for some event to actually apply the action. As an example see the image for the Variations Panel below.
- Action buttons are buttons that perform an action when clicked. These have rounded corners (and never light up blue). An example of such an action is “Load a MIDI pattern from a MIDI file”.
Transport Panel
The transport Panel has 4 buttons and 3 editors and a tick box.
- Override host: when ticked this allows you to override signature and BPM setting, and start/stop controls. If not overridden the controls below are disabled. There is a “record” button which only works in the Patterns tab.
- BPM editor: shows the current BPM setting; if the host is overridden you can edit this. If you enter silly data (negative values or text) this defaults to 120.
- Signature editor fields: if the host is overridden you can edit these yourself. If you enter silly data (negative numbers or text) these default to 4/4. Once there is note data in the patterns you are no longer able to change the signature – set it first, and then load/create patterns and variations.
- Transport Stop button.
- Transport Run button.
- Transport Record button.
- Override host tickbox:
- If disabled, the plugin will respond to transport commands from the host and it will take BPM and meter from the host as well. Above mentioned buttons and editors will be disabled.
- If enabled, the plugin will enable the buttons and editors and you can control the transport from within the plugin, ignoring the host.
Variations Panel

This one is found top/right. It has 8 toggle buttons, one for each variation. In the above example Variation 1 is selected, but it is not playing yet. This might indicate that Topiary Riffz is waiting for a note on event. See further in the discussion about WFFN (Wait For First Note) in the Master Tab section of this document.
Master Tab
In the master tab the user controls overall settings. It consists of 2 panels:
- Patterns table: a table that lists all loaded patterns
- Settings Panel: buttons and comboboxes for overall settings
Patterns Table
The table lists all loaded patterns. Pattern names can be edited by double clicking on a pattern name. Note that editing/recording to the patterns themselves is done in the patterns tab.
Next to the table is a series of action buttons:
- Add pattern: adds a new empty pattern, consisting of 1 measure.
- Load MIDI file: allow you to select a MIDI pattern file and load that into the pattern selected. Please note:
- The plugin assumes a validpattern file. It expects 1 track – which can be any channel, i.e. the plugin does not assume of enforce the pattern data to be on anyparticular channel. But behavior is undefined when loading pattern files that have more than 1 track of MIDI/note events.
- Make sure the signature setting in the Transport Panel matches the signature in the pattern file loaded. If these do not match behavior is undefined!
- To load a new pattern file, you need to create a new (empty) pattern first.
- When loading a pattern file into a pre-existing (non-empty) pattern, the pre-existing pattern will be deleted first You can use “overload” is you want to merge 2 MIDI files.
- The pattern name will be initialized to the name of the file you loaded. Feel free to change it by double clicking on the pattern name in the table.
- Delete pattern: deletes the pattern selected in the table.
- Duplicate pattern: makes a copy of the selected pattern.
- Overload: loads a new MIDI file on top of a pre-existing pattern. The length of the result is the longest of both original pattern and overloaded pattern.
Use Case for Overloading
Here’s an interesting use case for overloading (assuming you have read the rest of the manual). Say you have a steady left hand pattern, and a separate right hand pattern. You might overloadone with the other and you will end up with a 2-hand pattern.
Settings Panel
The Settings Panel allows for various overall settings, and loading/saving of TopiaryRiffz presets.

- WFFN (Wait For First Note): when this button is toggled on, Riffz will wait for an incoming note before starting to generate output; during that wait the play button will color orange; it will turn blue as soon as the first note is received. If WFFN is off and you either hit the play button (in case transport is overridden) or you hit the play function in your host, Riffz will immediately start generating output.
- Echo MIDI: if toggled on Riffz will pass any incoming note on to the sound source connected to it. If toggled off these notes will not be passed into that sound source.
- There are 2 Latching buttons. If you hit either, the other will be turned off, or you can have both turned off:
- If you have no latching, a pattern will play only when, or as long as (one of) it’s keys is pressed. When the key is released the pattern stops playing immediately. Note: as soon as the transport has started (either by the host, or if WFFN is on, by the first keypress) patterns always follow the transport. Suppose you hit a new pattern key on measure 10, beat 3, and the pattern(s) assigned to that key have 1 measure, then the pattern that is triggerted will start playing at beat 3. If you want patterns to “reset” every time they are triggered, you need to use latching mode 2 below.
- Latch1: in this case when a key is released, the pattern keeps playing forever, or until a new pattern is triggered by means of a different keypress.
- Latch 2: in this case when a key is released, the pattern will continue according to Q Variation End. E.g. when this is set to “Whole pattern” then when a key that triggers a pattern is released, the pattern will play till the end of the pattern.
- In both latching modes, if you press a key that is not assigned to a pattern, nothing happens (i.e. if a patterns was playing, it keeps playing).
- In both latching modes, the start of a new pattern is also according to the setting of Q Variation Switch as described below.
- Output channel: the channel on which pattern notes and other MIDI events will be output.
- Keyrange: the plugin will only listen to input bvezeen the ‘from’ and ‘to’ values.
- Load and Save buttons; allow you to save your setup in an external file, or load it form an external file. These file have extension .tbe. The file format is actually XML – if you are interested what is inside these file, open one with any browser and have fun! The preset name is the text in the box to the left of the Save button (in this example the preset name is “New Riffz”). Note that the preset name is not linked to the name of the preset file (but you may want to keep those the same).
- Quantize Variation Start combobox: controls when a new variation starts playing. If set to Immediate, Riffz will switch variations as soon as the new variation is selected. That may give unwanted effects: suppose you have a 4/4 pattern playing, and you change variations somewhere halfway between beat 2 and 3 – in that case you will start beat 1 of the new variation, between beat 2 and 3 of the previous one. Set this combobox to e.g. Measure and the new variation will start playing when the current measure is over. In that case, while Riffz is waiting to make the switch, the newly variation selected will color orange.
- Note the above also applies to changes of patterns:E.g. when set to “Full pattern”, if you hit the key for a new pattern or same pattern with different offset when the previs pattern is only half way, the new key/pattern will not play until the “run” of the current pattern has finished .
- Quantize Variation End combobox: controls what happens when Riffz is stopped. If set to Immediate, Riffz will stop producing output as soon as the stop button is activated (in the plugin, or in your host’s transport). If set to Measure Riffz will complete the ongoing measure and stop after that.
- Quantize Variation Switch combobox: this one controls where in the new variation or pattern playing will start (whenever Riffz decides to make the switch, depending on Q Variation Start setting). There are various options:
- Switch from start: when a new variation starts playing it starts from the beginning of the new variation. Be careful; if you switch on beat 2 of a 4 beat pattern, the new variation’s first measure will then start in the middle of the originally running pattern! If you switch between beats you will screw up the sense of “beat’ :).
- Switch within beat: when a new variation starts playing, it will start in the same position in the first beat as where it was during the beat the previously running one was (so not necessarily from the start). You won’t screw up the sense of ‘beat’ this way, but you can still screw up the sense of ‘measure’ this way.
- Switch within measure: when a new variation starts playing it will start in the first measure of the variation, at the same position as within the measure that was previously playing. This way you won’t screw up the sense of measure.
- Switch within pattern: when a new variation starts playing it will start “intelligently” at the same position as the variation previously playing.
Example
An example to clarify Q Variation Switch ‘within pattern’, assuming the Q variation start setting is “beat”:
- Suppose Variation 1 has 5 measures of 4 beats, and we switch to variation 2 at beat 2 of measure 5
- Suppose Variation 2 has also 5 measures of 4 beats; variation 2 will start at beat 2 of measure 5 (within variation 2)
- Suppose Variation 2 has 8 measures of 4 beats; variation 2 will start at beat 2 of measure 5 (within variation 2)
- Suppose Variation 2 has 3 measures of 4 beats; variation 2 will start at beat 2 of measure 2 (within variation 2). That is because Riffz will consider measure 5 to the fifth measure in a series of Variation 2 patterns. 1 round of the whole of Variation 2 makes 3 measures, and the 5th measure is then the 2nd measure of the second run of Variation 2.
Sounds confusing? Play with the settings and it will make sense!
RECORDING MIDI
You can record MIDI in real time. First hit the record button to arm the plugin, then hit play to start. There are a couple of catches though:
- when recording, no variation is playing! Instead, the pattern that is selected in the pattern tab is playing. So notes assigned to pattern will NOT react during MIDI recording.
- Any MIDI events recorded are injected in that pattern.
- Switching variations does not work in record mode.
Variations Tab
In this tab you define the variations on the patterns loaded in the master tab. IT has several panels.

Variation Definition Panel
This is the main panel in this tab: it tells Riffz which variation uses which patterns. You select the variation to work with by means of the variation dropdown combobox. The top text edit is the name of the variation, which you can edit by double clicking in it. The toggle button enables or disables the variation. When a variation is disabled, clicking it in the Variation Panel on the top/right of the screen is disables (MIDI automation is disabled for that variation as well).
The other panels, described below, contain the settings for the variation selected in this panel.
Notes
- If there is no pattern at all in the Master Tab, the Variations Tab is disabled.
- If you disable all variations the run button will not work. The reason for that is that if there were no variation enabled, Riffz would not know what to do when it is asked to run.
- If you have a variation selected, and you disable that variation, it will remain selected, but the variation button will be disabled. If you hit run Riffz will pick an enabled variation to run instead, or if there are no enabled variations, run will disable.
- If you select a variation in the Variation Panel (top), the Variation Tab tries to follow. Of course a disabled variation cannot be selected in the Variation Panel, so that, you have to do using the dropdown in the Variation Definition Panel.
Note Assignment Panel
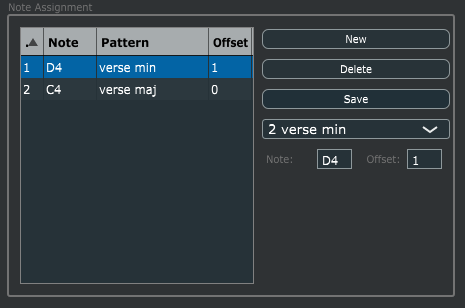
Here you assign keys to patterns.
To make a new assignment, hit New, fill out the Note and the offset, pick a pattern and hit Save. To edit an existing one, click it in the table, edit what needs editing and hit save. To delete an assignment, select it in the table and hit Delete.
MIDI Learn
If you right click in the Note editor (where you see D4 in the above image), you can do MIDI Learn; just hit the note you on your keyboard that you want to assign to and it will appear!
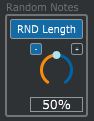
Random Notes Panel

If you enable this panel (toggle button that says “RND Notes”, occurrence of notes will be randomized. The toggle buttons 1-4 are not used in Riffz (they are used in other Topiary Presetz). The dial indicates what percentage of notes should be generated – 100% is all notes, 50% is one note out of every 2; 0 implies not notes generated at all.
Swing Panel

This panel, when enabled, controls swing. When set to negative, notes are generated “early” and when set positive notes are generated “late”. The swing algorithm is not standard and it works as follows:
- Swinging is done with a beat.
- When set to 100%, notes at 1/8 (or half the beat) are either generated at 1/16 (swing -100) or 3/16 (swing 1000. Any notes in between are moved backward/forward relatively; so swing applies to all notes (in the pools selected).
- If you’re interested in the math see the diagram below.

The X axis runs from 0 to end of beat, and so does the Y axis. The swing curve goes from -100 (blue) to +100. You’ll see that notes in the middle of the beat as pushed ‘forward’ for negative swing values, and pushed ‘backwards’ for positive swing values.
Velocity Randomization Panel

This controls randomization of velocity (if enabled):
- The dial controls how much randomization is applied. When set to 100 it applies randomization between 0 and 127. When set e.g. to 10 it will vary velocity by and amount between 0 and 12.8.
- The – and + buttons below the enable button control whether randomization is applies positively, negatively or both. If neither are selected velocity is not randomized.
- So, if both are selected, and the dial is at 10% then the total maximal variation in velocity is between -12.8 and 12.8.
- Buttons 1-4 are not used in Riffz (they are used in other Topiary plugins).
Timing Randomization Panel
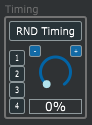
This panel (when enabled) randomized note timing. As for the Velocity Randomization Panel, whether timing is shifted up/down or both depends on the – and + buttons. When the dial is set to 100% the timing randomization stretches up to 1/8 of a beat (i.e. 1/32th). Buttons 1-4 are disabled in Riffz (they are used in other Topiary plugins).
Variation Type Panel
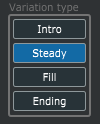
A variation can be any of 4 types: Intro, Steady, Fill or Ending; default is Steady.
- Steady: a steady variation keeps running; then done it repeats itself. Note that every “run” of a variation re-does any randomization.
- Ending: an ending variation plays only once, and then shuts up the plugin until the transport is stopped and restarted.
- Intro: an intro variation plays only once, and then the plugin switches to the first Steady variation it can find. If no steady variation can be found it tries a Fill variation, if that cannot be found it repeats the Intro variation.
- Fill: a Fill variation plays only once; when done the plugin reverts to the last played Steady variation (if any), if that one is undefined it picks the first Steady variation, if that cannot be found it keeps repeating the Fill variation.
Note Length Panel
This panel (when enabled) controls randomization of note lengths. If the + button is on notes may get longer, if the – button is on notes may get shorter (and both buttons may be on of course). Velocity offset works a bit like a mixer, but on velocity rather than on channel volume. The dial controls the amount of randomization applied.
Swing Resolution Panel
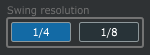
This controls whether swing is applied on 1/4 notes (meaning the interwoven 1/8 notes are swung) or on 1/58 notes (meaning the interwoven 1/16 notes are swung).
Pattern Tab
In this tab you can edit patterns loaded from MIDI files, as well as record your own patterns.
Ticks
Timing of events here is indicated in measure, beats and ticks. Every beat consists of 240 ticks.

- The pattern being inspected/edited is chosen by means of the combobox top/right.
- The pattern itself is shown in the table. Double click on any value to change it. Depending on the MIDI event (note, aftertouch, CC or pitch) the colums in the table have different meanings:
- For Notes:
- Val/Vel is the velocity
- For CC events:
- Label will say “CC”
- Length is the CC number
- Val-Vel is the CC value
- For aftertouch events:
- Label will say “AT”
- Length is not used
- Val-Vel is the aftertouch value
- For pitch events:
- Label will say “Pitch”
- Length is not used
- Val-Vel is the pitch value.
- For Notes:
- Length in measures/beats/ticks is shown right below. A pattern can be made longer or shorter by changing the value of “Measures” and clicking the Go button. When patterns are shortened, be default the first part of the pattern is kept; if you want to keep the last part you can enable the “Keep tail” option.
- Several actions can be taken here:
- “+Note” adds a note event at the position of the highlighted row in the table.
- “+AT” adds an aftertouch event at the position of the highlighted row in the table.
- “+CC” adds a MIDI Control event at the position of the hightlighted row in the table.
- “+Pitch” adds a MIDI pitch event at the position of the highligthed row in the table.
- “Delete” deletes the highlighted event.
- “Copy” makes a copy of the highlighted event. If you change location in the table (highlight another event) and you hit “Paste”, the copied event is inserted at the highlighted location.
- “Clear Pattern” deletes all notes.
- “Delete Notes” deletes all notes equal to the one in the highlighted row.
- Quantize does what it says:
- Choose your quantize resolution by means of the combobox.
- Then hit the “Quantize” button.
Utility Tab
In this tab you various utility operations.

Variation Switch Automation Panel

This tab defines which “commands” from your MIDI controller (or host) perform switching of variations. These can either be MIDI CC events (toggle button CC) or note events. You can enter the channel to listen to; if set to 0 Riffz will react to events in any channel. Next to that you set the CC or note to react to for each variation. Default is CC messages 22 tot 29.
MIDI Learn
If you right (double) click in the CH or V fields, you can do MIDI learn: hit or move any midi controller on your input device and there you go.
Copy/Swap Variations
These functions do what it says on the box – they allow you to move variation definitions around.
Preset State
The preset state utility warrants a bit of explanation:
- Lock Button: when the Lock button is toggled on, anuy changes you make to the plugin’s setup (patterns loaded, master settings, variation definitions etc) are lost when the plugin is saved in your DAW. Normal state is unlocked, which means that when you save your DAW state as you close it (eg. when you save a Reaper project with a Topiary Beatz plugin in it), the state of the plugin is saved and when you re-open the project, you will find the plugin exactly the way you left it. You can use ‘Lock’ to protect against accidental changes.
- Restore Button: if you have made changes to your pluging state, that broke whatever you have before, use Restore to re-set it to the last saved state. You can use this to undo any unwanted changes you may have made.
- Save Button: saves the current state. Remember you can recall a saved state. And if the Lock button is not latched on; the state is also saved when the plugin is saved in the host DAW’s project.
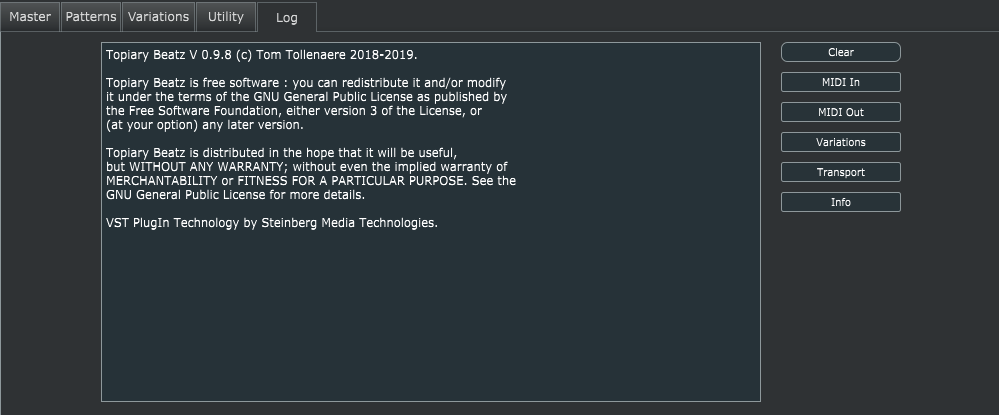
Log Tab
This tab shows logging information. At startup you will find the version number and license information. Lines in the log are timestamped in milliseconds – this may help finding (timing) problems. Any error or warning messages are shown in the log window – Topiary does not provide popup-windows with errors or warnings. So if in any tab, buttons do not react they way you expect them to, check the log window to see if anything is wrong (or whether you are trying to do something that does not make sense to Topiary).
Next to the log window are a series of buttons, one action button and several toggle buttons; the latter you may toggle on as many as you like:
- Clear button: an action button that clears the text.
- MIDI In: a toggle button. When on, the log window echos all MIDI events fed intro the plugin.
- MIDI Out: when toggled on, the log window echos all MIDI events generated by the plugin.
- Transport: when on, the log window echos transport commands (issued in the plugin or issued in the host).
- Variations: when on, the log window echo’s variation changes (timing buttons activated and timing of when the switches take place – see the Quantize buttons on the Master Tab for an explanation why those timings my not be identical.
- Info: when on, the log window spits out various information, such as e.g. the sample rate and blocksizes used by the host.
Log messages are not kept forever; once the number of lines in the log hits 1000, the oldest 500 lines are deleted.
VST Parameters
The plugin exposes some variation definition aspects as plugin parameters. That means that when a variation is running, you can change (e.g.) the note randomisation factor in real time. Check your DAW to see which parameters are exposed. FYI, the ones that are exposed can also be changed in the variation definition tab when the plugin is running. Give it a try!
Be careful though: if you change a variation definition setting during playback, the changes are permanent once you save the plugin state in your DAW. See the section on Plugin States for more (hint – if you want your plugin to “always remember” the original variation definition parameters irrespective of any changes you make to those during playback, you need to engage the Lock State button in the Utility tab!
Warnings

Warnings and error messages are found in the log window. But since the user may be working in a different tab it is easy to miss a warning. That is why the last warning is flashed in orange, for about 5 seconds, above the Variations panel at the top of the plugin. Certain error conditions trigger multiple warnings; only the last one is shown this way. When you get a warning like this, please check the log window, which may contain additional warnings/information.
In case you are wondering, the above warning is for the following condition:
- User hit the transport play button, but all variations are disabled, so the plugin can’t/won’t do anything, and hence it refuses to run.
Tips and Strange Cases
Here are a couple of practical tips:
- If you need latching but also need the option to “silence” pattern generation, use Latch1 mode and use an empty midi pattern and assign that to a key – you can then use that key to trigger the empty pattern, which will silence any other (non-silent) patterns.
- Be careful if you have ECHO MIDI on, and the key you use to assign to a pattern happens to be the first note in that pattern – you may get the same note twice, at the same time; in some DAWs the velocity used in that case is random.
- If want to set up a key to do a one-shot run of a pattern, totally dependent of the transport, use following settings:
- Latch2
- Q Variation Start = immediate
- Q Variation End = whole pattern
- In that case, if you kick off the pattern (again) while a previous run is still going on, generation will restart and the previoius run will not complete (to avoid cacophony). Note that the last note triggered of the previous run will run its course; depending on the length of that note it may overlap with the first note(s) of the new pattern run.
- Although Riffz was made and designed for melodic patterns, a pattern may be any MIDI information (apart from SysEx). There is nothing to stop you from e.g. defining patterns of MIDI CC values; those will be output like any other data and you might route those to other plugins to e.g. automate sweeps of parameters.
Here is some behaviour you may not expect (or explanations of strange behavior):
- If you have several variations, and these do not use the same note assignments, then when switching variations you will get the following behavior:
- Suppose we have Variation 1 with only one assignment for C4 and Variation 2 with nly one assignment for D4.
- With Latch1 or as long as you hold C4 pressed, starting in Variation 1 you will hear Variation 1; now switch to Variation 2 (which has no assignment for C4) and you’ll hear nothing; switch back to Variation 1 and you’ll hear it again.
- Same setup with Latch 2 and Q Variation End set to whole pattern; if you switch to Variation 2 just after you release key C4 (i.e. when Variation 1 is finishing up till the end of the pattern), sound will stop, i.e. the end of the latching will not be heard as soon as Variation 2 starts. So in case of variation switch, the ending of the latching will not necessarily follow Q Variation End!
- The bottom line of this is that in many cases you will want tohave the same key assignments in each variation to avoid ‘holes’ in pattern generation (unless that is what you want – but sse the first of the above tips for an alternative way to hush pattern generation.
- Suppose we have Latch2, and we have note assignments for C4 and D5 (same pattern in same variation). Suppose Q Variation End set to whole pattern, you release C4 and hit D4 and immediately release it, then the pattern will keep playing till the end, but it will end with the offset of D4.
